
Blog - Full set of UHMW Factory UTV Skid plates go on our Turbo R - Part 3
If you haven't figured it out yet, the skid plates on all RZR models that are included from the Polaris factory are pretty weak and the coverage is minimal. The plastic material they are made of is thin and they leave your RZR vulnerable, especially if you like to Rock Crawl. There's also zero protection for the a-arms, trailing arms or rockers. I installed A-arm skids plates last year on our Turbo R but I had been putting the full skid plate project off.
A few weeks ago, our riding buddy Todd experienced an unfortunate event up by Red Cone in Colorado. We aren't exactly sure when or where it happened but somewhere along the 50 miles of trail that day, a rock hit Todd's skid plate in just the right spot and ripped a hole in the skid plate and cracked both case halves on his transmission in the process. Fortunately it happened toward the end of the ride. The transmission still had some fluid in it so it wasn't a complete loss but it was a costly repair. This convinced Todd and myself to go ahead shell out for upgraded skid plates.
Todd's skid plate damage:

I've had excellent experiences with Factory UTV, I've installed their kits on my last 4 RZRs and again opted to go with Factory UTV for my Turbo R skid plate upgrade. I also opted for the heavier 1/2" thick skids coupled with the x-brace for added peace of mind that my transmission wouldn't suffer the fate of Todd's. My rockers and trailing arms were also showing some signs of damage from rocks to I opted to install added protection to those components as well with Factory UTV's rock slider kit and trailing arm guard kit.
Now on to the install...
Before you do anything make sure you pick up a high quality 13/64 cobalt drill bit. I found one at my local Ace hardware for around $7. You will also need a 1/4-20 tap. If you already have a tap set with that size in it, I'd still pick up an extra tap as I pretty much wore out the first one on this project and it was nice to switch to a fresh one mid way through the project.
To get started, I've found that if you jack the machine up off the ground and then just let it down, the suspension can't settle much giving you a good six inches or more of extra ground clearance to roll around under the machine without needing jack stands or a lift. It's also much safer than jack stands!

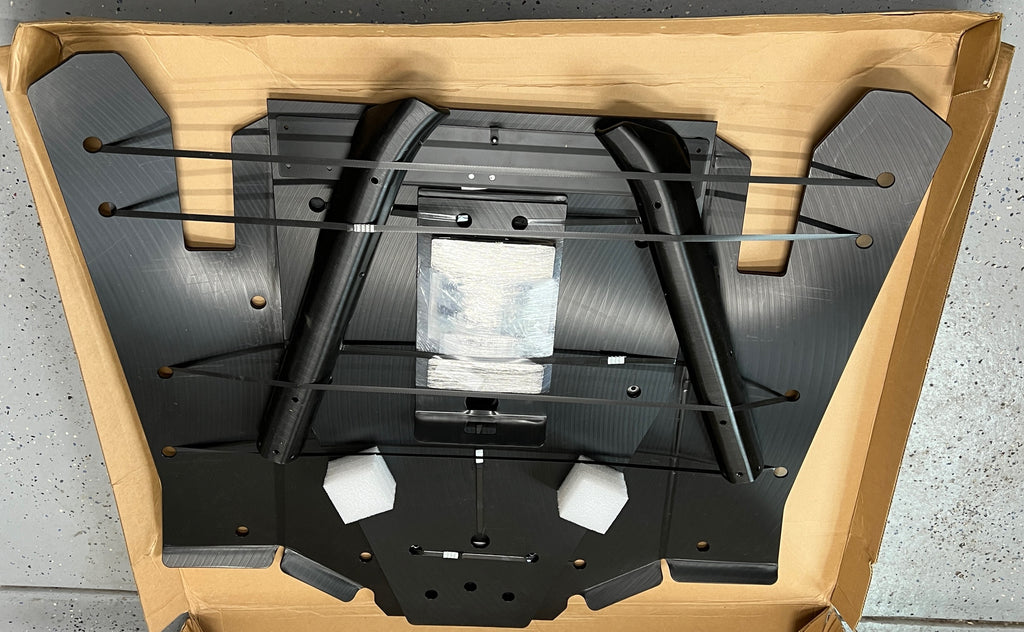
The way everything was packaged was impressive. Nice work FUTV.

The hardware comes in several different zip lock bags with labels on them pertaining to their functions. The instructions were also provided. I have mixed feelings about the instructions. While they work and are pretty clear and concise, I had to read through them a few times to understand them fully. You'll find yourself flipping back and forth from the main diagram to the linear instructions trying to grasp what order you are doing things in and what hardware goes where. I just find the layout of the instructions quite unusual. My recommendation would be to take the instructions in the house, sit down on the couch and step through them once or twice to get yourself familiar with them and then go back out to the garage and do the work. Probably my biggest gripe is that Factory UTV uses a different thread pitch for the extra bolts you have to use on the skid plate making it kind of tedious to track which bolts go where. The diagram is clear but there's just a lot of bolts to track.

Rather than use a creeper, I find it a little more convenient to slide around on a big piece of cardboard under the machine. If you don't already have a big piece of cardboard like this, you are in luck, the new skid plate kit comes with one! 
I started by unbolting the the factory skid plate, I always lay out the removed bolts on the ground so that I know exactly where they go back. Some of them are different lengths and the additional Factory UTV bolts you will be adding are a different thread pitch so it is a good idea to know what bolts came from what holes when you go to put the new skids back on. Almost all of the original bolts will be re-used.

You can see here one of the weaknesses of the factory skid plate is the bolts and washers aren't very well protected from catching on rocks. Although the washer was damaged pretty badly, in this case the bolt head had not snapped off. I think on every other machine I've had, at least one bolt was already completely snapped off making for some extra work to get the remainder of the broken off bolt out of the frame.

Besides the obvious extra thickness and protection that the 1/2" thick plate provides vs. the 3/8" thick plates that Factory UTV also offers, this is the other advantage, the bolts and washer are nicely recessed in the skid plate with very little possibility of being ripped off by a rock.

On other RZR models like the XP 1000, Turbo and Turbo S, once you have the bolts out of the skid plate, the main skid plate will pretty much fall off. That is not the case with the Turbo R, once you have all the bolts off, the front portion of the main skid will still cling to the frame due to some big plastic clips that are still hanging on to the frame. It just takes a little muscle and yanking but the skid plate will pull free from the frame without removing any other bolts. You can see the frame clips in the photo here. Don't toss this piece just yet!

With the skids off, you can see just how vulnerable the transmission is with just that flimsy factory skid plate between the transmission and unforgiving rocks.

Now is an excellent time to put some grease in the midsection of your driveshaft slip yolk while you can easily get to it.

Now we are almost ready to start installing new parts. This part of the project was a surprise to me since it is different from other machines I have put skid plates on. You actually have to cut off the front corners of the old skid plate and re-use these sections. At first, I didn't like this idea but these pieces are very fitted to the body in the back section of the wheels wells and they do really well at keeping debris from getting in between the skid plates and frame. Once you have it all back together you'll see it was a smart idea on Factory UTV's part that makes a lot of sense. I've actually had complaints from some customers on other brands of skid plates that don't seal this area off well.
I used a yard stick and a Sharpie to mark a line to cut.

I just used my antique hand-me-down jigsaw to do the cutting. Note we'll be seeing the big frame clip again since it is attached to the pieces we are re-using.

In this photo, you can really see what those re-used corners do to keep a factory look but also not leave a big gap between the frame and the main skid plate. Despite not liking the cutting and re-using at first, in practice it looks good and functions perfectly.

Before you fully bolt in the main skid plate up, we need to install the rock sliders. I was impressed with the brackets Factory UTV came up with.

Installing the rock slider brackets is pretty straight forward, you can see here where they slide into the provisioned holes in the frame.


The lower section of the rock sliders slide in between the frame and the main skid making for a clean fit on the bottom side then just bolt them to the brackets. Once they are bolted up, you do have to drill and tap some of the holes for the bottom bolts.

Here you can see the x-brace between the rear section of skid and the frame giving you extra piece of mind that you will never damage your transmission from a rock hitting it from below.

If you haven't had enough drilling and tapping yet, you are in luck. All six of the holes for the front section of the skid plate have to be drilled and tapped. It was a this point I switched to my backup tap as the first one was just not cutting it any more, literally. The steel plate you are drilling into here is also thicker than the frame tubes so it is quite a bit more laborious to drill and tap these six.

With the main skids and rock sliders done, the only thing left is the trailing arm guards. There's some new longer hardware and a spacer that allows the guard to bolt in between the mud flap-rock guard. I bolted it in and then found it was handy to use some clamps to hold the guard in place and tight to the trailing arm. From there, I think you have around seven holes to drill and tap per trailing arm guard. Be careful with your drill bit on the front most holes for the trailing arm guard. The way the trailing arms are constructed, my bit went through but then caught on something inside the trailing arm and snapped off. Otherwise the rest of the drilling and tapping was straight forward.

Pay attention to the bolt locations as there are extra holes in the railing arm guards that are drain holes and/or are not used.

With everything installed, you'll have the confidence to go hit the rocks a lot harder than in the past. As an added benefit, I've noticed in deep snow, your machine will slide across the snow like a sled. The a-arm guards especially make a difference in the snow with flotation and sliding.

If you like this article, please consider purchasing your skid plates through us at RockPeak.